이 게시물에서는 arduino 및 토양 수분 센서를 사용하여 작은 정원을위한 자동화 된 물 관개 시스템을 구축 할 것입니다.
소개
제안 된 시스템은 토양 수분 수준 모니터링 토양 수분이 미리 설정된 값 아래로 떨어지면 12V DC 펌프가 미리 결정된 시간 동안 작동됩니다. 토양 수분 수준의 상태 및 시스템의 기타 기능은 실시간으로 16 x 2 LCD 디스플레이를 통해 모니터링 할 수 있습니다.
전 세계에 3 조 그루의 나무가있는 것으로 추정되는데, 이는 우리 고향 은하계의 시작 수인 1,000 억 개보다 더 많은 것입니다. 그러나 우리 인간은 사치품에 대한 기본적인 욕구를 충족시키기 위해 수많은 나무를 자릅니다.
대자연은 피드백 시스템으로 설계되었는데, 어떤 종이 큰 교란을 일으키면 자연이 종을 없애 버릴 것입니다.
인간은 수세기 동안 무의식적으로 자연을 교란 시켰지만 과학과 기술의 대대적 인 발전 후에도 교란의 비율은 줄어들지 않았습니다.
기후 변화가 그 예 중 하나입니다. 우리 종족이 오래 지속되지 않을만큼 과감 해지면
이 프로젝트는 자연을 보존하기 위해 아기 한 걸음 더 나아가 인간의 상호 작용없이 사랑스러운 작은 정원을 관개 할 수 있습니다. 이제 프로젝트의 기술적 세부 사항에 대해 알아 보겠습니다.
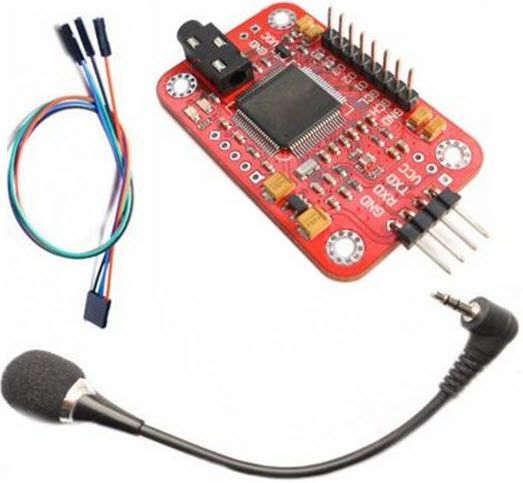
토양 수분 센서 :
프로젝트의 핵심은 토양 수분 센서 토양의 수분 함량을 감지 할 수 있습니다. 센서는 아날로그 값을 제공하고 마이크로 컨트롤러는 이러한 값을 해석하고 수분 함량을 표시합니다.
토양에 삽입되는 두 개의 전극이 있습니다. 전극은 비교기 IC, LED, 트리머 저항 입력 및 출력 핀으로 구성된 회로 기판에 연결됩니다.
토양 수분 센서 그림 :

4 + 2 핀, 전극 연결 용 2 핀이 있으며 나머지 4 핀은 Vcc, GND, 디지털 출력 및 아날로그 출력입니다. 토양 수분을 감지하기 위해 아날로그 출력 핀만 사용할 것입니다.
디지털 출력 핀을 사용하지 않기 때문에 온보드 트리머 저항을 사용하여 센서를 보정하지 않습니다.
이제 토양 수분 센서를 마칩니다.
개략도:
회로는 매우 간단하고 초보자에게 친숙합니다. 회로도는 프로젝트를 복제하면서 혼동을 줄이기 위해 동일한 프로젝트의 두 부분으로 나뉩니다.

위의 회로도는 LCD에서 Arduino로 배선. LCD 디스플레이의 대비를 조정하기 위해 10K 전위차계가 제공됩니다.

다음은 토양 수분 센서, 12V DC 펌프, 보정 푸시 버튼 및 12V (1-2A) 전원 공급 장치로 구성된 나머지 회로도입니다. 12V DC 펌프의 정격 전류가 500mA 이상인 전원 공급 장치를 사용하십시오.
BJT 대신 MOSFET IRF540N (또는 이에 상응하는 N- 채널)을 사용하여 시스템의 전체 전력 효율을 개선합니다.
펌프는 작은 정원에 물을 줄 것이며 항상 충분한 양의 물을 사용할 수 있는지 확인하십시오.
프로그램 코드 :
//-------------Program Developed By R.Girish-------------//
#include
LiquidCrystal lcd(12, 11, 5, 4, 3, 2)
int Time = 5 // Set time in minutes
int threshold = 30 // set threshold in percentage 80, 70, 60, 50, 40, 30, 20 only.
int i
int x
int y
int z
int start
int calibrateValue
const int calibrateBTN = A1
const int input = A0
const int motor = 7
boolean calibration = false
boolean rescue = false
void setup()
{
Serial.begin(9600)
pinMode(input, INPUT)
pinMode(calibrateBTN, INPUT)
pinMode(motor, OUTPUT)
digitalWrite(calibrateBTN, HIGH)
lcd.begin(16,2)
lcd.setCursor(0,0)
lcd.print('Pour water and')
lcd.setCursor(0,1)
lcd.print('press calibrate')
while(!calibration)
{
if(digitalRead(calibrateBTN)==LOW)
{
calibrateValue = analogRead(input)
x = 1023 - calibrateValue
x = x/10
Serial.print('Difference = ')
Serial.println(x)
Serial.print('Calibration Value = ')
Serial.println(calibrateValue)
delay(500)
lcd.clear()
lcd.setCursor(0,0)
lcd.print('Calibration done')
lcd.setCursor(0,1)
lcd.print('successfully !!!')
calibration = true
delay(2000)
}
}
}
void loop()
{
if(analogRead(input)<= calibrateValue)
{
delay(500)
lcd.clear()
lcd.setCursor(0,0)
lcd.print('Soil Moisture')
lcd.setCursor(0,1)
lcd.print('Level: 100%')
}
if(analogRead(input) > calibrateValue && analogRead(input) <= calibrateValue+x)
{
lcd.clear()
lcd.setCursor(0,0)
lcd.print('Soil Moisture')
lcd.setCursor(0,1)
lcd.print('Level: 90 to 99%')
}
if(analogRead(input) > calibrateValue+x && analogRead(input) <= calibrateValue+2*x )
{
lcd.clear()
lcd.setCursor(0,0)
lcd.print('Soil Moisture')
lcd.setCursor(0,1)
lcd.print('Level: 80 to 90%')
start = 80
}
if(analogRead(input) > calibrateValue+2*x && analogRead(input) <= calibrateValue+3*x)
{
lcd.clear()
lcd.setCursor(0,0)
lcd.print('Soil Moisture')
lcd.setCursor(0,1)
lcd.print('Level: 70 to 80%')
start = 70
}
if(analogRead(input) > calibrateValue+3*x && analogRead(input) <= calibrateValue+4*x)
{
lcd.clear()
lcd.setCursor(0,0)
lcd.print('Soil Moisture')
lcd.setCursor(0,1)
lcd.print('Level: 60 to 70%')
start = 60
}
if(analogRead(input) > calibrateValue+4*x && analogRead(input) <= calibrateValue+5*x)
{
lcd.clear()
lcd.setCursor(0,0)
lcd.print('Soil Moisture')
lcd.setCursor(0,1)
lcd.print('Level: 50 to 60%')
start = 50
}
if(analogRead(input) > calibrateValue+5*x && analogRead(input) <= calibrateValue+6*x)
{
lcd.clear()
lcd.setCursor(0,0)
lcd.print('Soil Moisture')
lcd.setCursor(0,1)
lcd.print('Level: 40 to 50%')
start = 40
}
if(analogRead(input) > calibrateValue+6*x && analogRead(input) <= calibrateValue+7*x)
{
lcd.clear()
lcd.setCursor(0,0)
lcd.print('Soil Moisture')
lcd.setCursor(0,1)
lcd.print('Level: 30 to 40%')
start = 30
}
if(analogRead(input) > calibrateValue+7*x && analogRead(input) <= calibrateValue+8*x)
{
lcd.clear()
lcd.setCursor(0,0)
lcd.print('Soil Moisture')
lcd.setCursor(0,1)
lcd.print('Level: 20 to 30%')
start = 20
}
if(analogRead(input) > calibrateValue+8*x && analogRead(input) <= calibrateValue+9*x)
{
lcd.clear()
lcd.setCursor(0,0)
lcd.print('Soil Moisture')
lcd.setCursor(0,1)
lcd.print('Level: 10 to 20%')
start = 10
}
if(analogRead(input) > calibrateValue+9*x && analogRead(input) <= calibrateValue+10*x)
{
lcd.clear()
lcd.setCursor(0,0)
lcd.print('Soil Moisture')
lcd.setCursor(0,1)
lcd.print('Level: <10%')
rescue = true
}
if(start == threshold || rescue)
{
y = Time
digitalWrite(motor, HIGH)
Time = Time*60
z = Time
for(i=0 i
“3상 모터 속도 제어 ”
이 자동 관개 시스템을 보정하는 방법 :
• 완성 된 하드웨어를 사용하여 물이 흐르는 경로 어딘가의 토양에 전극을 삽입합니다.
• 이제 프로그램에서 두 값을 변경합니다. 1) 모든 식물에 물을주는 데 걸리는 시간 (분). 2) arduino가 펌프를 트리거하는 임계 값 수준. 백분율 값은 80, 70, 60, 50, 40, 30, 20 만 설정할 수 있습니다.
int Time = 5 // 시간을 분으로 설정
int threshold = 30 // 임계 값을 80, 70, 60, 50, 40, 30, 20 비율로만 설정합니다.
프로그램에서 값을 변경하십시오.
• arduino에 코드를 업로드하고 회로에 전원을 공급합니다. “pour water and press calibrate”가 표시됩니다. 이제 정원에 충분한 물을 수동으로 물을 주어야합니다.
• 정원에 물을 준 후 보정 버튼을 누릅니다. 이것은 완전히 습기가 많은 토양에서 전기 전도를 결정하고 기준 값을 스냅 샷합니다.
• 이제 시스템이 작은 정원에 서비스를 제공 할 준비가되었습니다. 이 프로젝트에 대한 전원 백업을 추가하십시오. 전원이 차단되면 기준 보정 값이 메모리에서 지워지고 시스템을 다시 보정해야합니다.
저자의 프로토 타입 :

토양 수분 수준 표시 :


펌프가 켜지면 꺼질 남은 시간 (초)이 표시됩니다.
이전 : 3 스마트 레이저 경보 보호 회로 다음 : OCL 증폭기 설명